1.Latent Diffusion Modelsを使ってテキストから画像を生成まとめ
・Latent DiffusionはDALL·E Flowが内部で呼んでいるモデルのベースとなったモデル
・DALL·E同様にテキストから画像の生成だけでなく画像内の物体を消し去る事などが出来る
・様々なデータで学習したモデルのログとチェックポイントも公開されているので応用可能
2.Latent Diffusion Modelsとは?
以下、github.comより「CompVis / latent-diffusion」の意訳です。元記事は2022年4月、Robin Rombachさん、Andreas Blattmannさん、Dominik Lorenzさん、Patrick Esserさん、Björn Ommerさんによる投稿です。
latent-diffusionは、DALL·E Flowが内部で呼んでいるGLID-3-XLのベースになっているモデルです。微調整を含め、とても色々な事が出来そうなのですが、githubに書かれている手順で実行しただけでは私のGeForce RTX 3060のLinux環境では動かせなかったので、動かし方のメモついでに全文を意訳しておきます。
以下、私が動かすために必要だった手順
以下を参照にCondaのインストール
https://docs.conda.io/en/latest/
git clone https://github.com/CompVis/latent-diffusion.git
cd latent-diffusion
conda env create -f environment.yaml
conda activate ldm
#学習済モデルのダウンロード
mkdir -p models/ldm/text2img-large/
wget -O models/ldm/text2img-large/model.ckpt https://ommer-lab.com/files/latent-diffusion/nitro/txt2img-f8-large/model.ckpt
#デモ画像の生成
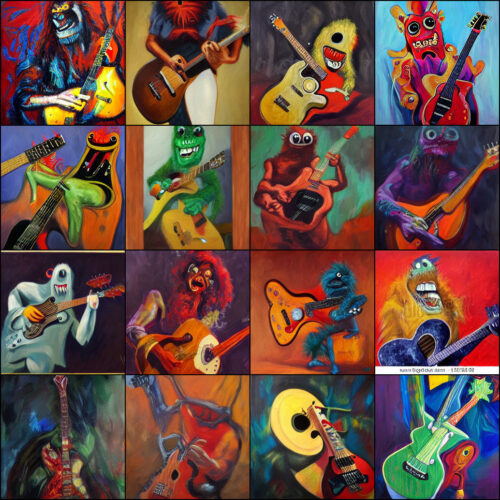
python scripts/txt2img.py –prompt “a virus monster is playing guitar, oil on canvas” –ddim_eta 0.0 –n_samples 4 –n_iter 4 –scale 5.0 –ddim_steps 50
#成功するとoutputs/txt2img-samples以下に次のような画像ができます
# もし、画像生成時に以下のOSErrorが出る場合
# ../../../../libcublas.so.11: undefined symbol: free_gemm_select, version libcublasLt.so.11
pip install torch==1.7.1+cu110 torchvision==0.8.2+cu110 torchaudio===0.7.2 -f https://download.pytorch.org/whl/torch_stable.html
#もし、画像生成時に以下のImportErrorが出る場合
#cannot import name ‘get_num_classes’ from ‘torchmetrics.utilities.data’
conda install -c conda-forge torchmetrics===0.6.0
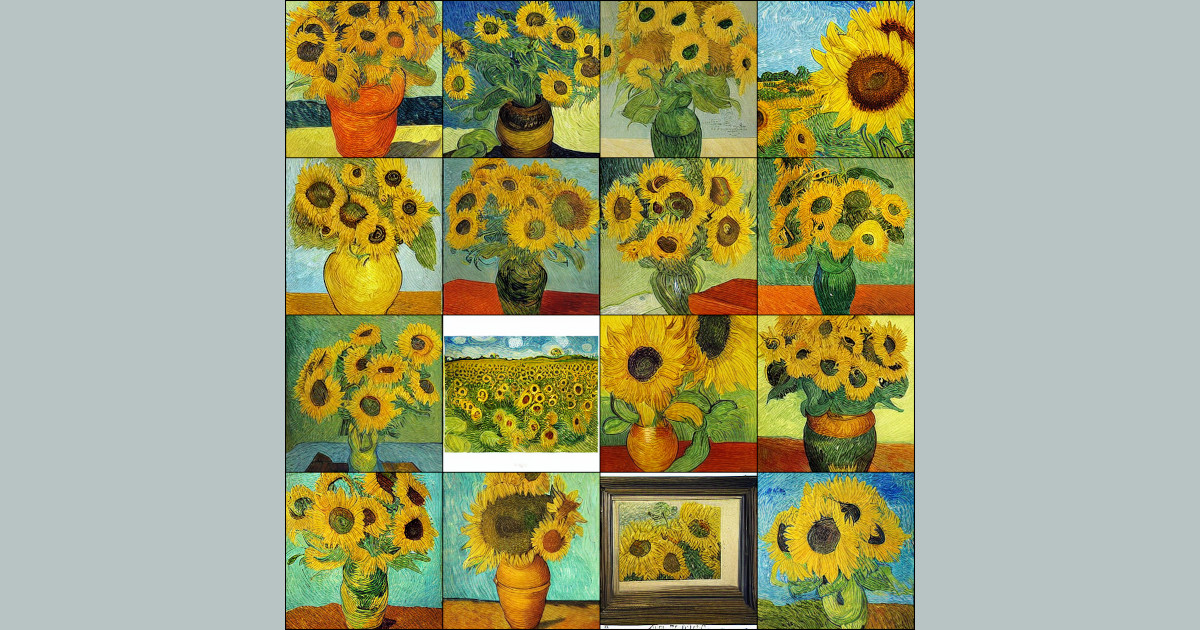
アイキャッチ画像はlatent diffusionによる生成でゴッホのひまわり
latent diffusionモデルによる高解像度画像合成
Robin Rombach*、Andreas Blattmann*、Dominik Lorenz、Patrick Esser、Björn Ommer
* 同等の貢献
ニュース
2022年4月
・Katherine Crowsonのおかげで、分類器なしのガイダンスが約2倍のスピードアップを果たし、PLMSサンプラーが利用可能になりました。こちらのプルリクエストもご覧ください。
・私たちの1.45Bのlatent diffusion LAIONモデルがGradioを使ってHuggingface Spaces 🤗に統合されました。Hugging Face spaces(https://huggingface.co/spaces/multimodalart/latentdiffusion)のウェブデモをお試しください。
・多くの学習済みLDMが利用可能です。
・LAION-400Mデータベースで学習した1.45Bのモデル。
・ImageNetのクラス条件付きモデル。分類器不要のガイダンスを使用した場合、FIDは3.6を達成しました。colab notebook(https://colab.research.google.com/github/CompVis/latent-diffusion/blob/main/scripts/latent_imagenet_diffusion.ipynb)でデモが可能です
ldm という名前の conda 環境を作成し、起動することができます。
必要条件
conda env create -f environment.yaml conda activate ldm
事前学習済みモデル
利用可能なすべてのチェックポイントの一般的なリストは、Model Zooセクションから入手可能です。これらのモデルのいずれかをあなたの研究で使用する場合、いつでも私たちは引用が明示されることを嬉しく思います。
テキストから画像へ
学習済み重みのダウンロード (5.7GB)
mkdir -p models/ldm/text2img-large/ wget -O models/ldm/text2img-large/model.ckpt https://ommer-lab.com/files/latent-diffusion/nitro/txt2img-f8-large/model.ckpt
サンプルの作成方法
python scripts/txt2img.py --prompt "a virus monster is playing guitar, oil on canvas" --ddim_eta 0.0 --n_samples 4 --n_iter 4 --scale 5.0 --ddim_steps 50
このコマンドは、指定された出力場所(デフォルト:outputs/txt2img-samples)にn_samples枚のサンプル画像と、グリッドサイズn_iterに全サンプルを並べて1枚にした画像を保存します。品質、サンプリング速度、多様性は、scale、ddim_steps、ddim_eta引数で最もよく制御されます。
経験則として、scaleの高い値は、出力の多様性を低下させるという代償を払って、より良いサンプルを生成します。
さらに、ddim_steps を増加させると、一般的に高品質のサンプルが得られますが、250 を超える値では見返りが少なくなります。ddim_eta 0.0を使用すると、良い品質を保ったまま高速にサンプリング(つまりddim_stepsの値が小さい)することができます。
ddim_eta 0.0 と –plms (論文:Pseudo Numerical Methods for Diffusion Models on Manifolds 参照) を使用すると、良い品質を保ちながら、より速いサンプリング (すなわち、ddim_stepsの値がさらに小さい) が可能です。
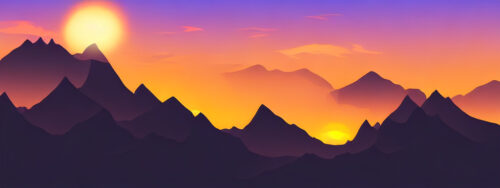
256²を超える
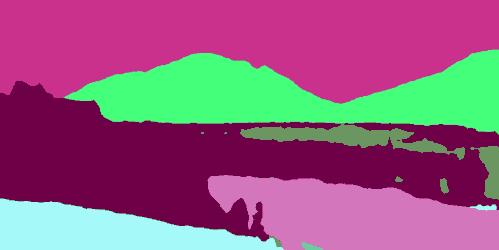
ある入力に対して、単純に学習させた特徴量よりも大きな特徴量で畳み込みモデルを実行すると、面白い結果になることがあります。これを試すには、HとWの引数(これらは対応するlatent sizeを計算するために8で整数で割られます)を調整します、例えば、以下を実行
python scripts/txt2img.py --prompt "a sunset behind a mountain range, vector image" --ddim_eta 1.0 --n_samples 1 --n_iter 1 --H 384 --W 1024 --scale 5.0
を実行すると、サイズ384×1024のサンプルが作成されます。ただし、256×256の設定に比べ、制御性が低下することに注意してください。
以下の例は、上記のコマンドで生成したものです。
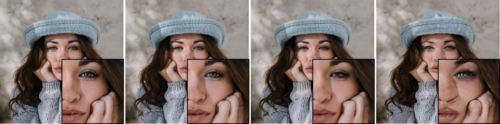
インペイント加工
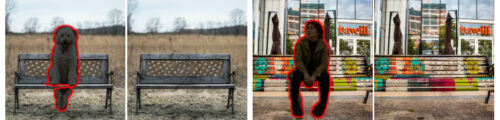
学習済み重みのダウンロード
wget -O models/ldm/inpainting_big/last.ckpt https://heibox.uni-heidelberg.de/f/4d9ac7ea40c64582b7c9/?dl=1
サンプルの作成方法
python scripts/inpaint.py --indir data/inpainting_examples/ --outdir outputs/inpainting_results
indirには、data/inpainting_examplesで提供されている例のように、画像*.pngとマスク<image_fname>_mask.pngが含まれている必要があります。
クラス条件付きImageNet
colab notebook(https://colab.research.google.com/github/CompVis/latent-diffusion/blob/main/scripts/latent_imagenet_diffusion.ipynb)でデモが可能です

条件無しモデル
また、条件無しLDM(例:LSUN、FFHQ、…)からサンプリングするためのスクリプトも用意されています。このスクリプトは
CUDA_VISIBLE_DEVICES=<GPU_ID> python scripts/sample_diffusion.py -r models/ldm/<model_spec>/model.ckpt -l <logdir> -n <\#samples> --batch_size <batch_size> -c <\#ddim steps> -e <\#eta>
貴方自身のLDMのトレーニング
データ作成
Face
CelebA-HQとFFHQのデータセットをダウンロードするには、taming-transformersリポジトリに記載されている手順に従ってください。
LSUN
LSUNのデータセットは、https://github.com/fyu/lsunのスクリプトでダウンロードできます。トレーニング画像と検証画像にカスタム分割し、対応するファイル名を https://ommer-lab.com/files/lsun.zip で提供しています。ダウンロード後、./data/lsunに解凍してください。beds/cats/churchesのサブセットもそれぞれ./data/lsun/bedrooms/ ./data/lsun/cats/ ./data/lsun/churchesに配置/シンボリックリンクされるべきです。
ImageNet
以下のコードは、初回使用時にImageNetを(Academic Torrentsを通じて)ダウンロードし、準備しようとします。しかし、ImageNetは非常に大きいため、多くのディスクスペースと時間を必要とします。もし既にディスク上にImageNetがある場合は、データを${XDG_CACHE}/autoencoders/data/ILSVRC2012_{split}/data/(デフォルトは~/.cache/autoencoders/data/ILSVRC2012_{split}/data/)({split}は train/validation のいずれか)に置くとスピードアップが図れるでしょう。以下のような構造になっているはずです。
├── n01440764
│ ├── n01440764_10026.JPEG
│ ├── n01440764_10027.JPEG
│ ├── …
├── n01443537
│ ├── n01443537_10007.JPEG
│ ├── n01443537_10014.JPEG
│ ├── …
├── …
データを抽出していない場合は、ILSVRC2012_img_train.tar/ILSVRC2012_img_val.tar(またはそのシンボリックリンク)を${XDG_CACHE}/autoencoders/data/ILSVRC2012_train/ / ${XDG_CACHE}/autoencoders/data/ILSVRC2012_validation/ へ入れると、再度ダウンロードしなくても上記の構造体に抽出されるようになっています。
${XDG_CACHE}/autoencoders/data/ILSVRC2012_{split}/data/とファイル ${XDG_CACHE}/autoencoders/data/ILSVRC2012_{split}/.ready が存在しない場合のみこの現象が起こりますので注意してください。データセット作成を強制的に再実行する場合は、これらを削除してください。
モデルの学習
学習したモデルのログとチェックポイントはlogs/<START_DATE_AND_TIME>_<config_spec>に保存されます。
オートエンコーダーモデルの学習
KL正則化オートエンコーダーをImageNet上で学習するための設定がconfigs/autoencoderに用意されています。学習は以下のコマンドで開始できます。
CUDA_VISIBLE_DEVICES=<GPU_ID> python main.py --base configs/autoencoder/<config_spec>.yaml -t --gpus 0,
ここで、config_spec は {
autoencoder_kl_8x8x64(f=32, d=64),
autoencoder_kl_16x16(f=16, d=16),
autoencoder_kl_32x32x4(f=8, d=4),
autoencoder_kl_64x64x3(f=4, d=3) } のいずれかです。
VQ正則化モデルの学習については、taming-transformersレポジトリを参照してください。
LDMの学習
configs/latent-diffusion/には、LSUN-, CelebA-HQ, FFHQ, ImageNetデータセットでLDMを学習するための設定項目が用意されています。学習は次のコマンドで開始できます。
CUDA_VISIBLE_DEVICES=<GPU_ID> python main.py --base configs/latent-diffusion/<config_spec>.yaml -t --gpus 0,
ここで <config_spec> は以下のいずれか一つです。
celebahq-ldm-vq-4(f=4, VQ-reg. autoencoder, spatial size 64x64x3)
ffhq-ldm-vq-4(f=4, VQ-reg. autoencoder, spatial size 64x64x3)
lsun_bedrooms-ldm-vq-4(f=4, VQ-reg. autoencoder, spatial size 64x64x3)
lsun_churches-ldm-vq-4(f=8, KL-reg. autoencoder, spatial size 32x32x4)
cin-ldm-vq-8(f=8, VQ-reg. autoencoder, spatial size 32x32x4)
Model Zoo
事前学習済み自動エンコードモデル
すべてのモデルは、収束するまで(rFIDにこれ以上の実質的な改善が見られないまで)学習されました。
| Model | rFID vs val | train steps | PSNR | PSIM | Link | Comments |
| f=4, VQ (Z=8192, d=3) | 0.58 | 533066 | 27.43 +/- 4.26 | 0.53 +/- 0.21 | https://ommer-lab.com/files/latent-diffusion/vq-f4.zip | |
| f=4, VQ (Z=8192, d=3) | 1.06 | 658131 | 25.21 +/- 4.17 | 0.72 +/- 0.26 | https://heibox.uni-heidelberg.de/f/9c6681f64bb94338a069/?dl=1 | no attention |
| f=8, VQ (Z=16384, d=4) | 1.14 | 971043 | 23.07 +/- 3.99 | 1.17 +/- 0.36 | https://ommer-lab.com/files/latent-diffusion/vq-f8.zip | |
| f=8, VQ (Z=256, d=4) | 1.49 | 1608649 | 22.35 +/- 3.81 | 1.26 +/- 0.37 | https://ommer-lab.com/files/latent-diffusion/vq-f8-n256.zip | |
| f=16, VQ (Z=16384, d=8) | 5.15 | 1101166 | 20.83 +/- 3.61 | 1.73 +/- 0.43 | https://heibox.uni-heidelberg.de/f/0e42b04e2e904890a9b6/?dl=1 | |
| f=4, KL | 0.27 | 176991 | 27.53 +/- 4.54 | 0.55 +/- 0.24 | https://ommer-lab.com/files/latent-diffusion/kl-f4.zip | |
| f=8, KL | 0.9 | 246803 | 24.19 +/- 4.19 | 1.02 +/- 0.35 | https://ommer-lab.com/files/latent-diffusion/kl-f8.zip | |
| f=16, KL (d=16) | 0.87 | 442998 | 24.08 +/- 4.22 | 1.07 +/- 0.36 | https://ommer-lab.com/files/latent-diffusion/kl-f16.zip | |
| f=32, KL (d=64) | 2.04 | 406763 | 22.27 +/- 3.93 | 1.41 +/- 0.40 | https://ommer-lab.com/files/latent-diffusion/kl-f32.zip |
モデルの取得
以下のスクリプトを実行すると、利用可能なすべての事前学習済み自動エンコードモデルをダウンロードし、抽出します。
bash scripts/download_first_stages.sh
第一段階のモデルは models/first_stage_models/<model_spec> で見つけることができます。
事前学習済みLDM
| Datset | Task | Model | FID | IS | Prec | Recall | Link | Comments |
| CelebA-HQ | Unconditional Image Synthesis | LDM-VQ-4 (200 DDIM steps, eta=0) | 5.11 (5.11) | 3.29 | 0.72 | 0.49 | https://ommer-lab.com/files/latent-diffusion/celeba.zip | |
| FFHQ | Unconditional Image Synthesis | LDM-VQ-4 (200 DDIM steps, eta=1) | 4.98 (4.98) | 4.50 (4.50) | 0.73 | 0.5 | https://ommer-lab.com/files/latent-diffusion/ffhq.zip | |
| LSUN-Churches | Unconditional Image Synthesis | LDM-KL-8 (400 DDIM steps, eta=0) | 4.02 (4.02) | 2.72 | 0.64 | 0.52 | https://ommer-lab.com/files/latent-diffusion/lsun_churches.zip | |
| LSUN-Bedrooms | Unconditional Image Synthesis | LDM-VQ-4 (200 DDIM steps, eta=1) | 2.95 (3.0) | 2.22 (2.23) | 0.66 | 0.48 | https://ommer-lab.com/files/latent-diffusion/lsun_bedrooms.zip | |
| ImageNet | Class-conditional Image Synthesis | LDM-VQ-8 (200 DDIM steps, eta=1) | 7.77(7.76)* /15.82** | 201.56(209.52)* /78.82** | 0.84* / 0.65** | 0.35* / 0.63** | https://ommer-lab.com/files/latent-diffusion/cin.zip | *: w/ guiding, classifier_scale 10 **: w/o guiding, scores in bracket calculated with script provided by ADM |
| Conceptual Captions | Text-conditional Image Synthesis | LDM-VQ-f4 (100 DDIM steps, eta=0) | 16.79 | 13.89 | N/A | N/A | https://ommer-lab.com/files/latent-diffusion/text2img.zip | finetuned from LAION |
| OpenImages | Super-resolution | LDM-VQ-4 | N/A | N/A | N/A | N/A | https://ommer-lab.com/files/latent-diffusion/sr_bsr.zip | BSR image degradation |
| OpenImages | Layout-to-Image Synthesis | LDM-VQ-4 (200 DDIM steps, eta=0) | 32.02 | 15.92 | N/A | N/A | https://ommer-lab.com/files/latent-diffusion/layout2img_model.zip | |
| Landscapes | Semantic Image Synthesis | LDM-VQ-4 | N/A | N/A | N/A | N/A | https://ommer-lab.com/files/latent-diffusion/semantic_synthesis256.zip | |
| Landscapes | Semantic Image Synthesis | LDM-VQ-4 | N/A | N/A | N/A | N/A | https://ommer-lab.com/files/latent-diffusion/semantic_synthesis.zip | finetuned on resolution 512×512 |
モデルの入手
上記のLDMは以下の方法で一緒にダウンロードし、抽出することができます。
bash scripts/download_models.sh
モデルは models/ldm/<model_spec> にあります。
近日公開予定…
条件付きLDMの推論スクリプトが追加されます。
それまでは、colab notebook(https://colab.research.google.com/drive/1xqzUi2iXQXDqXBHQGP9Mqt2YrYW6cx-J?usp=sharing) で遊んでみてください。
コメント
私たちの拡散モデルのコードベースは、OpenAIのADMコードベースとhttps://github.com/lucidrains/denoising-diffusion-pytorch に大きく依存しています。オープンソースに感謝します。
transformer encoderの実装は、lucidrainsのx-transformersを使用しています。
BibTeX
@misc{rombach2021highresolution,
title={High-Resolution Image Synthesis with Latent Diffusion Models},
author={Robin Rombach and Andreas Blattmann and Dominik Lorenz and Patrick Esser and Björn Ommer},
year={2021},
eprint={2112.10752},
archivePrefix={arXiv},
primaryClass={cs.CV}
}
3.Latent Diffusion Modelsを使ってテキストから画像を生成関連リンク
1)github.com
CompVis / latent-diffusion